


 Roll labels request form
  Booklet labels request form
  Folding boxes request form
  Custom made shipping boxes request form
  Package leaflets request form
  Laminate tubes request form


Print data requirements for pouch packaging
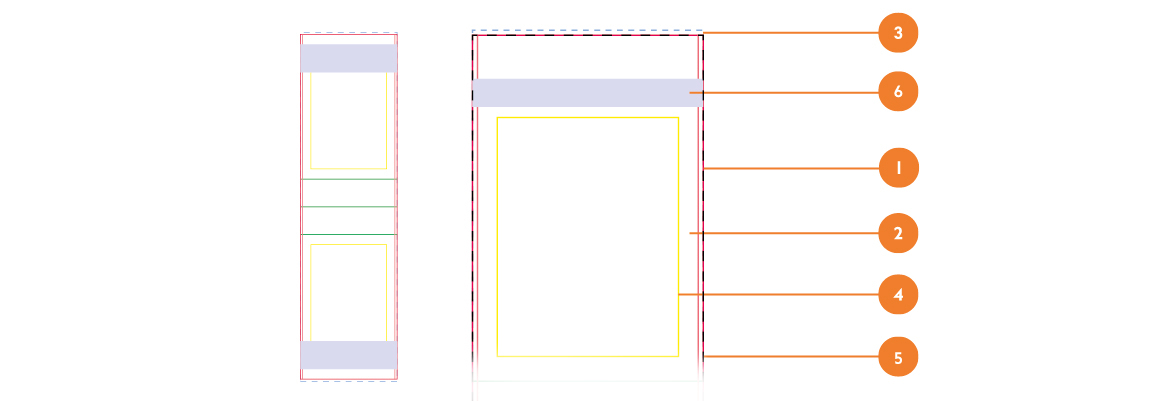
punching contour
Configure the pouch packaging in our online calculator and have the die cut outline sent as a template to create the print data.
The contours are created in solid color with the name "Stanze" and set to "overprint".
printable area
With pouch packaging, the entire area within the die-cutting contour can generally be printed.
Important elements (text, logo, image, graphic, etc.) should be placed in the area of the type area.
Elements that do not continue at the same height on the other side of the pouch should be placed at a distance of 3 mm from the die-cutter.
bleed
In order for the pouch packaging to have a perfect cut edge, elements (background image, background color, etc.) that end with the edge at the top and bottom must be created at least 3 mm beyond the die-cut contour.
Since production is only with a separating cut, no bleed is necessary on the left and right edges.
type area
For optimal quality, all important information should be located in this area.
end format frame
The final size frame indicates the dimensions of the finished printed product (without the bleed) and corresponds to the size of the die-cut outline.
zipper
In the case of zippered pouch packaging, no important elements should be placed in this area.
Please note the following general requirements for creating your artwork.

Format PDF/X-4:2010
Please save your artwork as a PDF in the format PDF/X-4:2010
Please avoid following data formats:
.docx / .ppt / .ai / .eps / .jpg / .png / .tiff

Overprint / Knockout
When overprinting, the upper element overlaps the underlying one and both colours mix. When knocking out, the lower element is "exposed" to the area of the upper element and the color remains in its pure form.
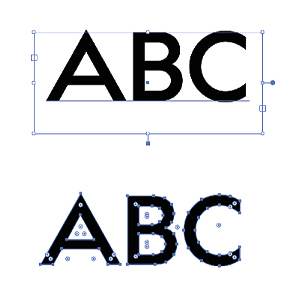
Embed fonts
Please embed all used fonts in the artwork. Alternatively, you can convert the fonts used in your layout to outlines.

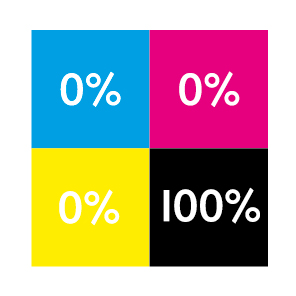
Colour spectrum CMYK
The printing industry works with the colour spectrum CMYK (Cyan, Magenta, Yellow, Black). Please create your files within this colour spectrum. RGB (Red, Green, Blue) is used for on-screen viewing, but cannot be printed out.
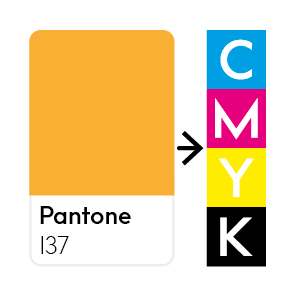
Special colours (Pantone or HKS)
Please use the original colour designations of the Pantone or HKS colour table. The conversion to CMYK is done directly on the printing machine. Spot colours can only be used in conventional printing. In digital printing, the colour mode CMYK is used - spot colours are only simulated.

Font size
• Standard: positive: min. 5 pt, negative: min. 6 pt
• Shipping cartons: min. 2 mm height for small letters
Ink coverage
The maximum ink coverage should not exceed 300 %. Apply 100 % K to black text and elements (e.g. shapes, lines, colour areas).

Image resolution min. 300 dpi
Use only high-resolution images with, depending on the image size, at least 300 dpi (dots-per-inch). Images with less DPI, e.g. low-resolution images from the Internet cannot be printed clearly and appear „pixelated“ (blurry) when printed.
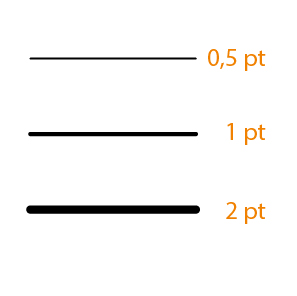
Line width
Please pay attention to the line thickness for graphic elements and fonts. We recommend thicker lines for negatively displayed / cut-out elements.
• Standard: min. 0.5 pt (negative / cutout = min. 1 pt)
• Shipping cartons: min. 0.2 mm (negative / blanked out = min. 0.4 mm)
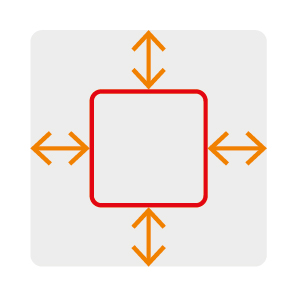
Safety distance
In order not to cut off important elements, a safety margin to the edge of your print data (punch / creasing / perforation) is required.
• Standard: min. 3 mm
• Labels & folding boxes: min. 1,5 mm
• Shipping cartons: min. 5 mm
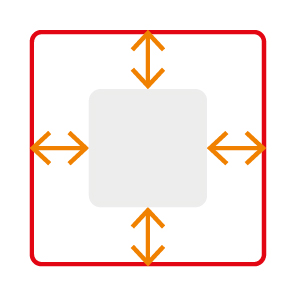
Bleed margin / trapping
In order to avoid unsightly „flashes“ in the material colour, we recommend that you create an edge trim.
• Standard: min. 2 mm (+ 3 mm overfill of glue flap for folding boxes)
• pouch packaging / package inserts: min. 3 mm
• Shipping cartons: min. 5 mm (+ 5 mm overfill of glue flap)

HPI-White
To ensure that the colours on transparent or dark materials, as well as gold and silver foil, are rich and vibrant, white should be printed under selected elements (logos, images, ...). To do this, define a spot colour called „HPI-White“ with a bright colour (e.g. 20 % cyan). Place HPI-White-Areas below the respective element and set the upper element to “Overprint”.

Hot foil stamping
When using the hot foil finishing, please create the element as a technical spot colour (solid colour) with the name „Heissfolienpraegung“. Set elements to „overprint“ and do not omit elements below.


